Your website design directly impacts user experience and success. A well-designed blog improves readability, boosts engagement, and builds credibility. Business owners often overlook how adjusting blog width affects visitor behavior. By learning how to change the width of a blog on WordPress, you can create a visually appealing site that keeps readers coming back.
For example, a narrow blog width might frustrate readers who scroll endlessly. On the other hand, overly wide layouts can overwhelm with excessive line length. A balanced width helps readers focus on your content without distraction. This guide walks you through simple steps to adjust your blog’s width, making your content shine.
Why Change Your Blog’s Width?
Adjusting your blog’s width ensures your home inspection content looks professional, easy to read, and visually appealing. A poor layout can frustrate visitors, making them leave your site quickly. Studies show that 88% of users won’t return after a bad online experience.
A wider layout is great for showcasing images, like photos of detailed home inspection reports or before-and-after property improvements. For example, if you’re sharing inspection tips or showing how you uncover hidden issues, a wide design makes visuals stand out. Meanwhile, a narrower width keeps readers focused on text-heavy posts, such as explaining the importance of radon testing or HVAC maintenance.
Home inspection businesses often tweak blog widths to improve user experience. A clear, balanced layout helps readers quickly find the information they need, whether they’re new homeowners or real estate agents. For instance, a blog post about mold inspection can use a clean design to emphasize key takeaways while supporting them with striking photos. These adjustments build trust and keep clients coming back for expert advice.
Methods to Adjust Blog Width
A well-structured blog layout is essential for realtors looking to attract buyers and sellers. Adjusting your blog’s width ensures your content is visually appealing, easy to read, and professional. Here’s how you can customize your blog for maximum impact.
Using the WordPress Customizer
The WordPress Customizer makes it simple for realtors to adjust blog width and create a professional, engaging website.
Here’s how to do it:

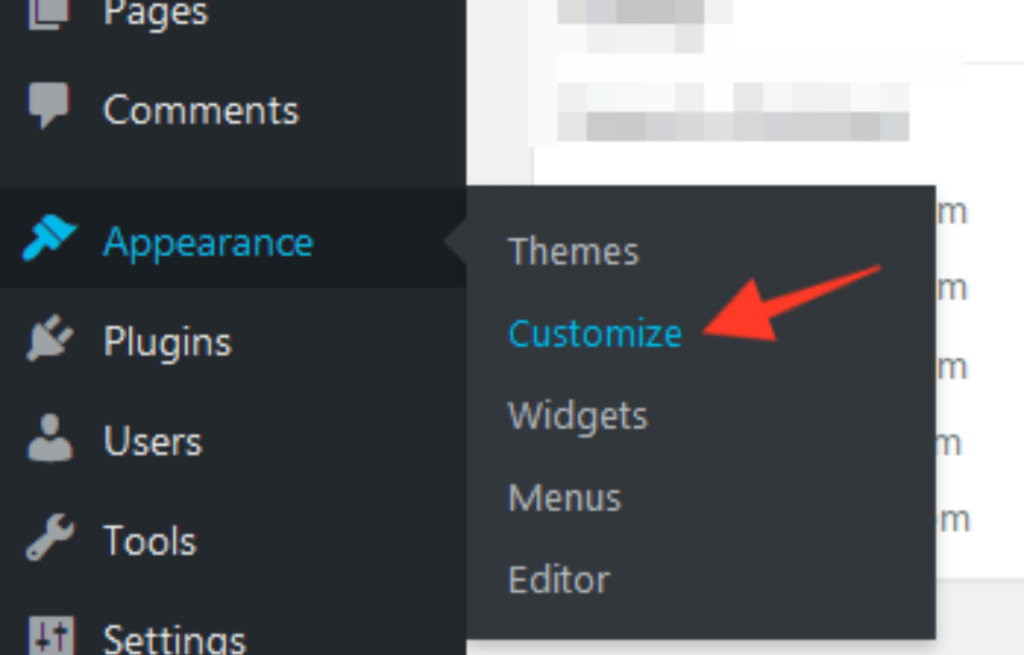
- Log in to WordPress: Go to your dashboard and click Appearance > Customize.
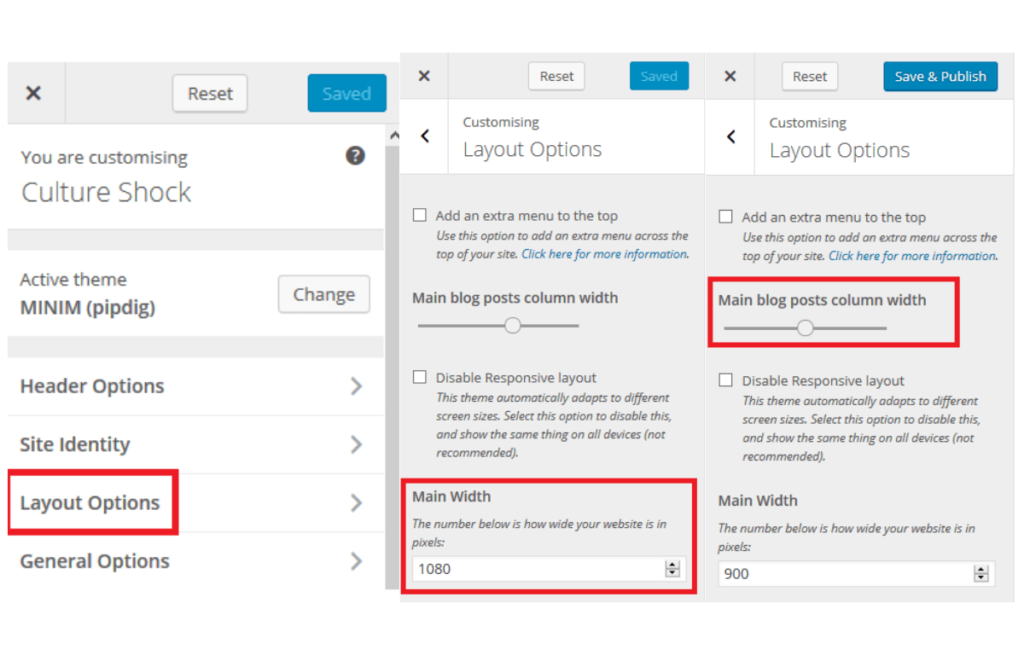
- Open Layout Options: In the Customizer menu, select “Layout Options.”
- Adjust Width Settings: Use sliders or input specific dimensions to set the width of your content area and sidebar.
- Preview and Save: Always preview changes to ensure your blog looks polished and responsive, then click “Save.”

For instance, setting your blog width to 1200 pixels ensures listings and property photos look sharp on desktops and tablets. A wider layout can emphasize vibrant home staging images, while a narrower design keeps readers focused on market insights or neighborhood guides.
A clean, balanced blog layout builds trust with buyers and sellers. Studies show that 57% of visitors judge a site’s credibility based on its design. By fine-tuning your blog’s width, you create a visually appealing space that keeps clients engaged and coming back for your expertise.
Editing Templates in the Block Editor

The WordPress Block Editor, or Gutenberg, provides health and nutrition professionals with tools to improve their blog’s layout and readability. Adjusting template widths can make your content more engaging, professional, and visually appealing, helping you attract and retain readers.
Here’s how to use it:
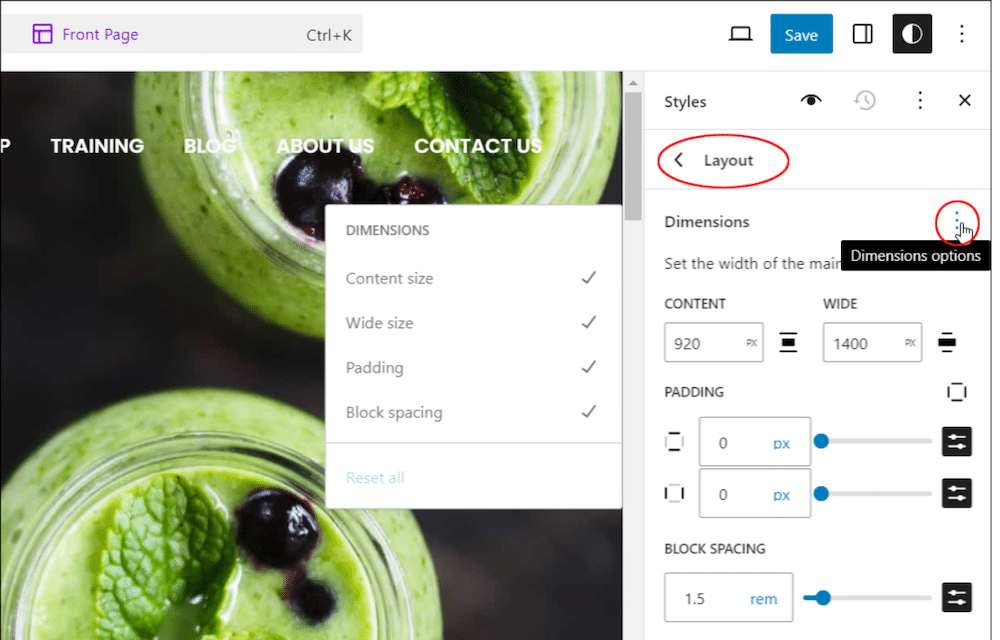
- Access Block Settings: Open the blog post or page you want to edit for better customization.
- Edit the Template: In the settings menu, choose “Edit Template” to adjust the layout of your blog.
- Adjust Group Dimensions: Select the layout group and locate “Content Width” in the block settings menu.
- Input Dimensions: Set a width, such as 1400 pixels, for a balanced layout that highlights images and aligns text perfectly.
For example, increasing the width of a blog post allows you to showcase high-quality images of nutritious smoothies or step-by-step recipes. A wider layout can also emphasize infographics explaining dietary benefits, making the content more engaging and easier to understand.
Customers are more likely to trust a professional-looking website. By tailoring your blog width using the Block Editor and learning how to change the width of a blog on WordPress, you ensure your content looks credible and keeps potential clients engaged.
Using the Cover Block for Visual Emphasis
The Cover Block in WordPress is an excellent tool for pest control companies to highlight key messages using striking visuals. This feature lets you combine text with images or videos to create engaging headers or introductions, perfect for landing pages or blog posts.
Here’s how to use it:
- Add a Cover Block: Click “Add Block” in the editor and select “Cover” to start.
- Upload Media: Choose an image or video relevant to your pest control services, like a before-and-after shot of treated spaces.
- Resize the Block: Under “Dimensions,” adjust the width to ensure the text is readable and fits the layout seamlessly.
For example, using a Cover Block with a photo of a pest-free home and text like “Say Goodbye to Pests Today” grabs attention. Setting the block to a wide layout, like 1400 pixels, creates a bold, professional look that resonates with visitors.
Studies show visuals increase user engagement by 80%, making the Cover Block an essential tool for landing pages that convert visitors into customers. This method ensures your website delivers a strong first impression while staying informative and visually appealing.
Plugins for Greater Control
For pest control companies aiming to create professional blogs or landing pages, plugins like SeedProd and Elementor provide easy layout customization. These tools let you adjust widths and designs effortlessly, even if you’re new to WordPress.
Here’s how these plugins help:
- SeedProd: Resize images, text, and buttons with drag-and-drop tools, ideal for creating visually compelling landing pages. For example, you can highlight a “Book Now” button alongside an image of a pest-free kitchen.
- Elementor: Adjust entire sections by dragging resizing handles, offering precise control over layout dimensions without coding. Use this for creating pages that showcase pest control success stories or service details.
Managing plugins ensures a smooth user experience for your visitors. Studies show that 38% of users stop engaging with websites that look unattractive. These tools help pest control businesses create balanced, engaging designs that keep customers interested.
For instance, adjusting the width of a service page to fit images of pest infestations and solutions makes the page more engaging. Plugins like these are ideal for beginners, combining flexibility and simplicity to refine your website’s appearance while boosting security and preventing vulnerabilities.
Real-World Examples of Blog Width Adjustments
Understanding how others adjusted blog widths can inspire changes for your pest control business website. Here are examples where tailored widths improved performance:
- Photography Portfolio: A photographer expanded their blog’s width to 1500 pixels, showcasing stunning high-resolution images without cropping. This simple change boosted visitor engagement by 30%, proving that wide layouts enhance visual storytelling.
- Online Store Blog: A fashion retailer narrowed their blog content to 900 pixels to improve readability for mobile users. This adjustment helped boost mobile sales by 20% as visitors found product descriptions and call-to-action buttons easier to follow.
- Tech Blog: A technology blog used the Cover Block with bold images and large, readable text to highlight tutorials. This layout change increased page views by 40%, demonstrating how engaging visuals and organized content drive traffic.
For a pest control company, similar adjustments can highlight success stories or showcase before-and-after images of treated properties. Wider layouts might work for case studies with detailed photos, while narrower designs can focus attention on actionable service descriptions. Learning how to change the width of a blog on WordPress lets you tailor layouts to your audience’s needs, significantly improving engagement and conversions.
Best Practices for Responsive Widths
A responsive blog design is crucial for engaging customers across all devices. Pest control companies can follow these best practices to create a user-friendly site:

Prioritize Mobile Users
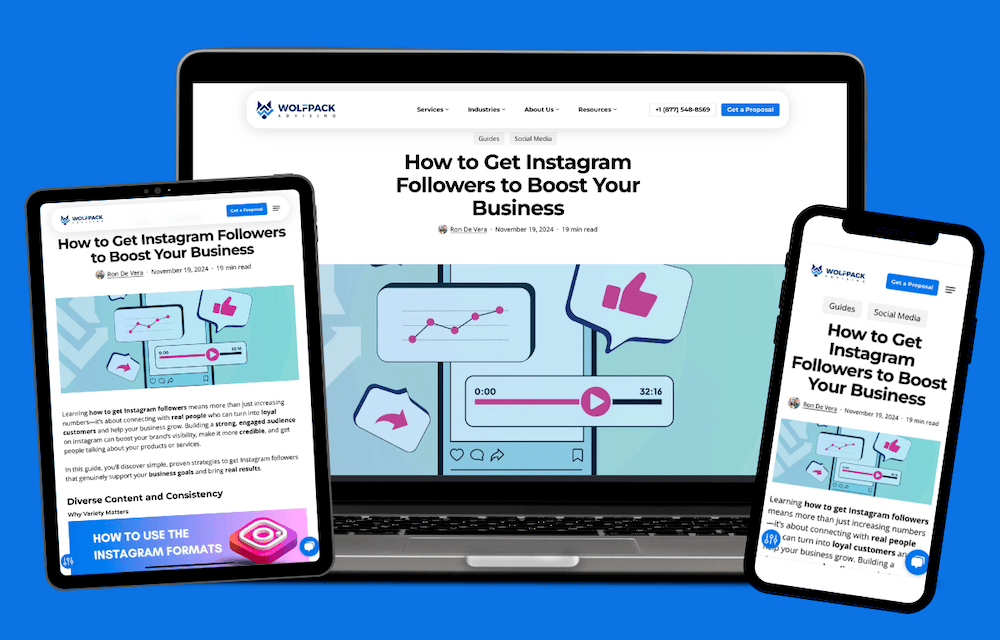
Ensure your blog adapts seamlessly to any screen size, including mobile phones, tablets, iPads, laptops, and desktops. With over 60% of web traffic coming from mobile devices, responsive themes are essential. They automatically adjust widths, ensuring your blog looks great on phones, tablets, and desktops. For example, mobile-friendly blogs make it easier for potential clients to contact you while on the go. Similarly, a well-adapted tablet or iPad view ensures smooth navigation for users browsing during downtime. On desktops or laptops, your blog’s wider layout can showcase detailed visuals and professional content, maintaining a polished appearance across platforms.
A responsive design keeps your website accessible and user-friendly, improving engagement and building trust with your audience.
Test Before Finalizing
Always test your changes using WordPress’s preview function. Check how your blog appears on desktops, tablets, and phones. This ensures your layout is consistent and professional. For instance, an overly wide design might look great on a desktop but become unreadable on smaller screens. Testing helps prevent such issues.
Balance Content and Whitespace
A cluttered blog overwhelms visitors. Maintain balance by spacing text, images, and whitespace evenly. For example, using enough space around a call-to-action button—like “Book a Free Inspection”—makes it stand out. Studies show well-balanced layouts improve readability and increase user retention by 40%.
Conclusion
Changing the width of your WordPress blog is a simple yet powerful way to enhance user experience and reflect your branding. Whether using Customizer, Block Editor, or plugins, learning how to change the width of a blog on WordPress helps you create tailored layouts to fit your business’s needs. Start experimenting today and see your website’s engagement grow!
Need expert guidance to elevate your website’s design or SEO? Schedule a consultation with Wolfpack Advising and let us help you achieve your goals!


