You can move your WordPress site to a new host without downtime by preparing your access, backing up your site, testing the new host first, and switching your DNS only after everything is ready. When you follow a safe process, your website stays online while the new host goes live in the background.
This guide explains how to move your WordPress site to a new host without downtime in simple terms. It focuses on do’s and don’ts, common pitfalls, and steps that protect your site ownership. It keeps the language easy to understand and avoids technical jargon.
Contents
Why a Zero-Downtime WordPress Migration Matters
When your website goes down, even for a short time, visitors may see errors, forms may stop working, and search engines may have trouble reaching your pages. This can lead to lost leads, missed sale,s and user frustration, especially for businesses that rely on steady traffic.
It also affects conversions more than most people realize.
A delay of just one second can lower conversions by 7% and increase bounce rates by up to 90%.
Moving your site does not have to cause any outages. With a simple plan and the right steps, you can keep your site live the entire time.
How WordPress Hosting Migration Actually Works
Before starting, it helps to clear up a common point of confusion: the difference between your domain and your hosting.
What is a domain?
Your domain is your website address, like example.com. It works like the street address for a house.
What is hosting
Your hosting is where your actual website files live. It works like the house itself. You can move your website files to a new host even if you keep the same domain.
Simple summary
Domain = address
Hosting = house
You can move one without always moving the other
Understanding this makes the rest of the migration process much easier.
What to Prepare Before Moving Your WordPress Site
A smooth migration begins with the right access and files. Here is a simple checklist to prepare:
Basic access you should have
- Current hosting login
- New hosting login
- WordPress admin username and password
- Access to your domain settings (DNS)
- A recent full backup of your site
Why this matters
Most migration issues come from missing or incorrect login access. Without proper access, you may not be able to complete the move or roll back changes if something goes wrong.
Launching a New Environment on Kinsta
If your new host is Kinsta, the first step is creating a new environment where your site will live. This is where you will install WordPress and load your migrated files.
Here is the simple process:
Kinsta will generate a new WordPress environment for your site. This is where your files, database, and design will be migrated before going live. Creating this environment before starting the migration helps you avoid downtime and allows you to test everything safely.
How to Transfer Your WordPress Site to a New Host
There is no single “right” way to move a site. The best method depends on your comfort level and the size of your website.
Host-assisted transfers
Some hosting companies offer their own migration services, which can be one of the easiest ways to move a site. For example, Kinsta includes a migration submission screen where you provide basic details, and their team handles the technical steps for you. This type of guided migration is helpful for people who want a smooth process without managing files, databases, or server settings on their own.
Professional migrations
A web developer or technical support team may handle the migration for you. This is helpful when you want a hands-off approach.
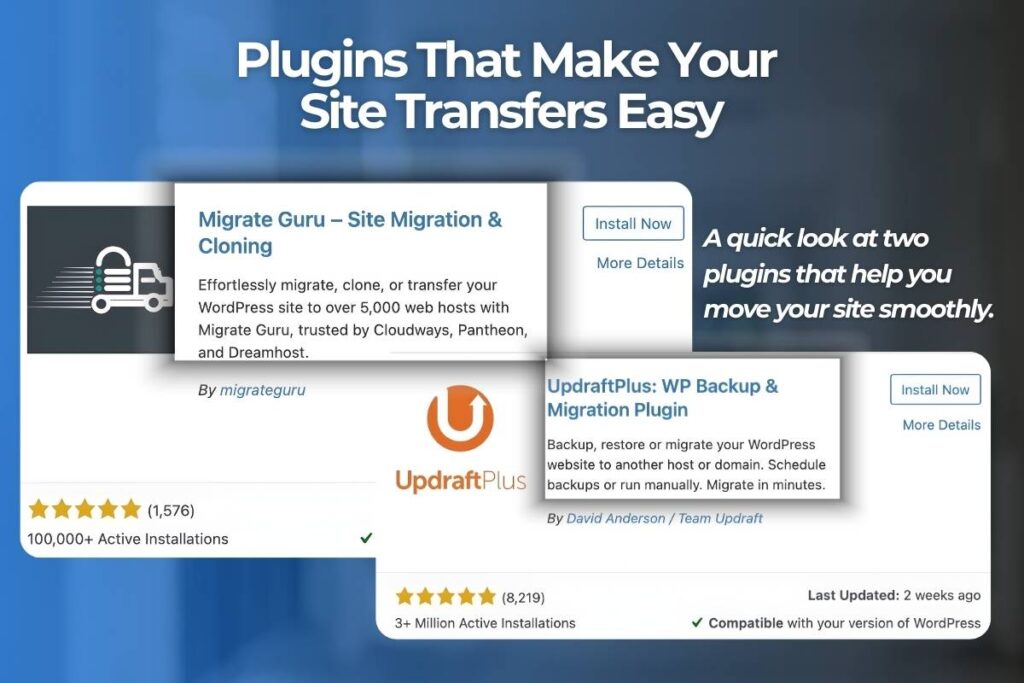
Plugin-assisted transfers
Plugins can copy your site from one host to another. They work well for smaller sites, but large or complex sites may run into errors.
Manual transfers
This is the most technical route. It involves exporting your files, downloading databases, and editing configuration settings. Most people do not need to use this method unless there is a very specific reason.
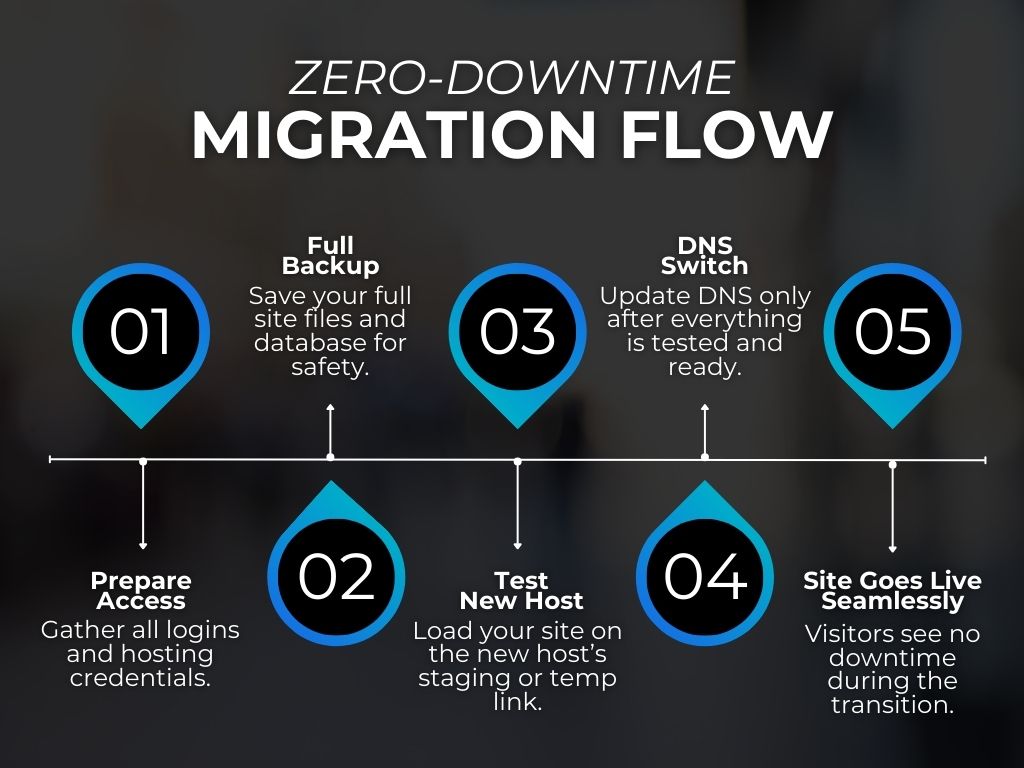
How to Move Your WordPress Site Without Downtime
A smooth and interruption-free migration depends on following a few essential steps. These steps reduce risk, protect your data, and ensure your visitors never notice anything changing in the background.
1. Make a Full Backup Before You Touch Anything
A complete backup is your safety net. If files break, a plugin fails, or something does not transfer correctly, a full backup allows you to restore your entire website quickly.
Back up your files, database, uploads, themes, and plugins so you can recover from any unexpected issue.
2. Check Plugin and Theme Compatibility Ahead of Time
Every hosting provider uses different server settings. Some plugins may not work the same way on your new host if PHP versions, security rules, or database configurations differ.
Review your active plugins and themes, and confirm they meet the requirements of your new hosting environment.
3. Test Your Site on a Temporary URL or Staging Link
Before going live, load your site on the temporary link your host provides. This preview helps you spot issues like missing images, layout changes, broken pages, or malfunctioning forms.
Click through every page, test contact forms, check menus, and look for formatting issues while you are still in the safe staging environment.
4. Choose the Right Time to Update Your DNS
DNS updates do not take effect instantly. Some users will see the old site while others see the new version as the update spreads across the internet.
Update DNS during low-traffic hours to reduce the chance of confusing visitors while the change is in progress.
5. Monitor DNS Propagation Until It Finishes
Propagation can take anywhere from a few minutes to 48 hours. It is normal for different visitors to see different versions of your site during this period.
Keep your old hosting active, monitor traffic, and watch for errors until DNS finishes updating everywhere.
Common Mistakes to Avoid in WordPress Site Migration
Even a well-planned migration can go wrong if a few important steps are overlooked. One common issue happens before the move even starts: choosing the cheapest hosting plan and expecting full support.
Low-cost plans often offer limited help, so if you run into trouble during the move, you may not get the guidance you need. Keeping that in mind, here are the most frequent mistakes people make when moving a WordPress site and how to avoid them.
1. Canceling Your Old Hosting Too Soon
Your old hosting should stay active until the entire migration is complete and DNS has fully propagated. If you cancel early, visitors may see broken pages, missing images, or error screens while some users are still being routed to the old server.
Keep both hosts active for at least 48 hours after your DNS update.
2. Assuming Migration Is Included in Your Hosting Plan
Not all hosts offer free migrations, and those that do may only cover basic transfers. Going in blind can lead to unexpected fees or a partially completed migration.
Confirm whether your host offers guided, assisted, or fully managed migrations, as well as what is included.
3. Skipping Plugin and Theme Compatibility Checks
Some hosts use different PHP versions, database configurations, or security settings that may conflict with certain plugins or themes. Skipping compatibility checks can lead to layout issues, missing functionality, or site errors after the move.
Review your active plugins and themes in advance, and confirm they meet your new host’s requirements.
4. Relying Entirely on Plugins for Large or Complex Sites
Migration plugins are convenient, but they can fail on bigger websites because of timeouts, file size limits, or server restrictions. Relying only on plugins increases the risk of incomplete transfers or corrupted files.
Use plugins only for smaller sites. For larger websites, use a host-assisted or manual migration.
5. Updating DNS Without a Tested Backup Plan
When you update a domain’s nameservers or DNS records, all traffic will begin routing through the new host or DNS provider. In many cases, you may update the nameservers specifically so you can manage the DNS without transferring the domain’s registrar. This allows the client to keep full control over their domain while you handle all DNS configuration.
However, if something goes wrong after these changes and you don’t have a quick way to revert, the live site can experience errors or downtime.
Always test your site on a temporary URL or staging link before updating nameservers or DNS, and keep a fresh backup ready in case you need to roll back quickly.
How to Keep Ownership Secure During a Host Change
Site ownership is one of the most overlooked parts of a hosting move. If you do not have full control of your domain, hosting, or files, you may not be able to move your website at all.
Common ownership problems
Some agencies register your domain or hosting under their own accounts. Others build sites on locked systems that cannot be moved.
When this happens, you may discover that you do not fully own:
- Your domain
- Your hosting
- Your design
- Your plugins
- Your site files
Some large, big-box marketing agencies build websites in a way that the client does not fully own the site files. In many cases, the business is actually leasing the website instead of owning it. This becomes a major problem during migration because you may not be allowed to download or move the files you need.
If you are having your website built or hosted through a service like this, always make sure you fully own your files and have the right to move your site whenever you choose. Otherwise, you may be forced to rebuild your entire website from scratch.
Why ownership matters
Full ownership protects your ability to change hosts, update your site, and keep long-term control over your online presence.
Understanding Different Hosting Providers
Every hosting provider is different. Here is a simple high-level comparison of what you might see.
| Feature | Typical Managed Hosting | Typical Budget Hosting | Other Providers |
|---|---|---|---|
| Free migrations | Often included | Sometimes | Varies |
| Monthly updates | Usually included | Limited | Varies |
| Security monitoring | Included | Basic | Varies |
| Site ownership | Client owned | Client owned | Depends |
| Support level | Personalized | General | Varies |
This simple comparison helps set expectations before choosing a new provider.
What a Smooth WordPress Migration Looks Like
A smooth migration follows a clear process that reduces risk and keeps your site online while everything moves behind the scenes. Knowing how it works helps you avoid errors.
Typical steps in a safe migration
- Create a full backup
- Check plugin and theme compatibility
- Set up your new hosting environment (ex: your new Kinsta site)
- Upload website files and your database
- Test the site on a temporary URL or staging link
- Review pages, forms, menus, and load speed
- Update your DNS when everything looks correct
- Monitor the site during DNS propagation
This workflow prevents most issues and helps ensure a stable transition.
Related Questions
What happens to my SEO when I move my WordPress site?
If your website host is also doing SEO for you and purchasing backlinks on your behalf, you may notice a traffic drop when you leave them. This is especially true if they were using spammy or low-quality backlink tactics. In these cases, the traffic drop isn’t caused by the migration itself it’s because you’re no longer benefiting from (or being harmed by) their link-building practices.
For the migration itself, your SEO should stay the same as long as the migration is done correctly. Keep your URLs and permalinks the same, avoid downtime, test all pages, and watch for broken links.
Do I need to move my domain when I move my WordPress hosting?
Most of the time, you do not need to move your domain. You can keep it registered where it is and simply update your nameservers and DNS to point to your new host. Updating the nameservers allows your hosting provider to manage the DNS on your behalf without transferring the domain’s registrar, so the client (or domain owner) still retains full control over the domain itself.
How long does DNS propagation take during a hosting move?
DNS updates can take minutes to 48 hours. Some visitors may see the old site, and others may see the new site design until propagation is complete.
Will my email accounts be affected when I switch hosting providers?
Your email may be affected if your email is tied to your hosting. If your email is separate, such as Gmail or Microsoft, nothing will change.
What type of backup should I complete before moving my site?
Create a full backup that includes your files, uploads, themes, plugins, and database. This protects your site in case anything goes wrong, especially when making website updates.
Conclusion
Moving your WordPress site to a new host does not need to cause downtime or stress. With the right access, a clean hosting setup, a full backup, and a tested staging link, the process becomes easier to manage. These steps help keep your site online while everything updates behind the scenes and ensure you stay in control of your website.
If you prefer guidance during the move or want help managing your site after the transition, WolfPack Advising provides support options that can simplify the process without added pressure.